Green screens are a game-changer for video creators. They open up a world of creative possibilities.
With the right techniques, you can transform your videos into something extraordinary.
Whether you’re an aspiring podcaster or a seasoned content creator, mastering green screen techniques is essential.
It might seem daunting at first, but with a little guidance, you’ll be a pro in no time.
In this guide, we’ll explore everything you need to know about using green screens effectively.
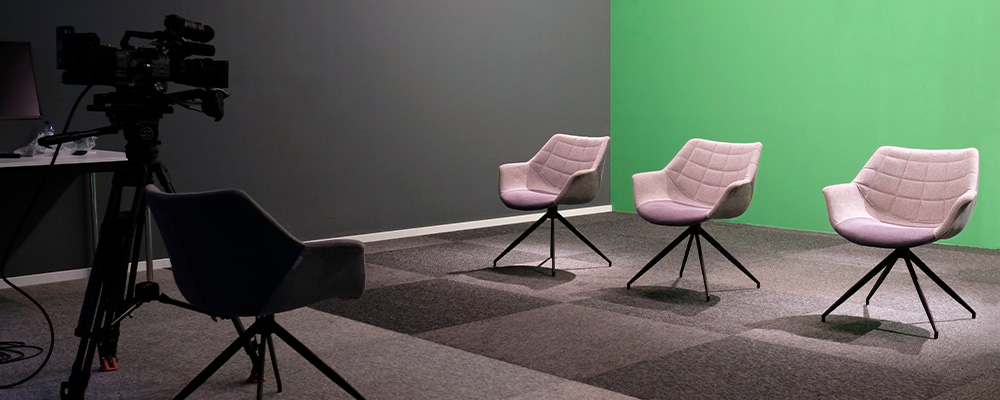
What Is a Green Screen and Why Use It?
A green screen is a solid color backdrop used in video and photography. It’s often green but can also be blue, tailored to your needs. The magic happens in post-production, where video editing software makes the background vanish.
This technique, called chroma keying, is essential for background removal. It lets you replace the green screen with any background, real or imagined. From exotic locations to animated settings, your imagination is the limit.
There are several reasons to use a green screen in your videos:
- Versatility: Easily change backgrounds for various themes.
- Cost-effectiveness: Save money on physical sets.
- Professional look: Enhance video quality and production value.
For podcasters and digital creators, a green screen adds a layer of creativity and professionalism. It ensures your videos stand out in a crowded content landscape. Moreover, mastering this technique can level up your storytelling, making your narratives more engaging and dynamic.
Essential Green Screen Setup: Tools and Space
Creating an effective green screen setup begins with selecting the right tools. Choose a backdrop that’s wrinkle-free and reflects minimal light. Options range from fabric screens to collapsible panels, catering to different space constraints.
The equipment needed extends beyond the screen itself. Invest in a sturdy backdrop stand to keep your screen stable. A reliable stand ensures your background remains taut and crease-free, which is vital for clean keying.
Lighting is another crucial component. Even lighting helps prevent shadows, which can distort background removal. Softboxes or ring lights are preferred for achieving a uniform illumination.
Organizing your space is just as important. Designate a specific area for your green screen setup to minimize setup time. A dedicated space allows for consistent positioning and efficient workflow.
Here’s a quick checklist to help you set up:
- Green Screen Material: Choose based on space and needs.
- Backdrop Stand: Keeps the screen steady.
- Lighting Equipment: Essential for even light spread.
- Camera and Tripod: Ensure steady shots and high-quality capture.
Preparation is crucial, and considering these elements will streamline your green screen journey. With the right tools and a well-organized space, your content creation efforts can soar.
Lighting: The Secret to Flawless Green Screen Results
Lighting can make or break your green screen results. Proper lighting ensures your screen is evenly lit, preventing unsightly shadows and color variations that complicate background removal.
It’s crucial to use a three-point lighting setup. This approach includes a key light, fill light, and backlight. The key light should illuminate the subject, while the fill light reduces shadows. Meanwhile, the backlight separates the subject from the background, adding depth.
Position your lights correctly for the best effect. Place softboxes or diffusers at 45-degree angles to the subject. Ensure the lights are at a consistent distance to maintain uniformity.
Let’s summarize the key lighting tips:
- Use Three-Point Lighting: Key, fill, and backlight.
- Avoid Shadows: Position lights to reduce shadow creation.
- Consistent Distance: Ensure even light distribution.
- Consider Light Quality: Use diffusers to soften harsh lights.
Mastering lighting might require experimentation, but it’s worth the effort. The payoff is a seamless green screen look that elevates your content quality. With lighting locked down, you’ll find editing a breeze.
Step-by-Step: Setting Up Your Green Screen for Video Podcasts and Livestreams
Setting up your green screen correctly is the first step toward producing professional-grade videos. Follow these steps for success in both video podcasts and livestreams.
First, choose a spacious area with controlled lighting. This setup minimizes unwanted shadows and allows free movement. Optimize your space based on content needs, with room for lighting and camera equipment.
Next, hang your green screen securely, ensuring it’s taut and wrinkle-free. A sturdy backdrop stand will prevent sagging and creases. Aim for a smooth surface to facilitate clean chroma keying.
Pay attention to the distance between the subject and the green screen. Maintain at least a 3-foot gap to avoid color spill, where the green reflects onto your subject. This distance will ensure a defined separation between subject and background.
Here’s a quick checklist for your green screen setup:
- Select a spacious, well-lit area.
- Secure and smooth the green screen backdrop.
- Maintain subject-to-background distance.
Testing your setup before filming is vital. Make adjustments as needed to achieve the best results. A solid foundation guarantees a polished final product, making your video podcasts and livestreams stand out.
Recording Tips: Getting the Best Footage
Capturing high-quality footage is key to maximizing the potential of your green screen setup. Start by using a high-resolution camera to ensure every detail is captured clearly. This approach provides sharp footage, making post-production smoother and more efficient.
Ensure your camera is stable for consistent shots. A tripod is invaluable for maintaining steady angles and eliminating shaky footage. Consistency in camera placement aids in achieving a flawless chroma key effect during editing.
Pay close attention to the clothing your subject wears. Avoid colors similar to the green screen to prevent them from blending into the background. Selecting contrasting colors will help maintain a clear distinction between the subject and the green screen.
Here’s a practical list of quick recording tips:
- Use a high-resolution camera.
- Stabilize your camera with a tripod.
- Choose contrasting clothing for subjects.
Recording high-quality footage is not just about technical specs. It’s about understanding the nuances and keeping an eye on details that align with your overall content vision.
Background Removal and Chroma Key: Editing Like a Pro
Diving into the world of video editing is where your green screen efforts pay off. The process of background removal, known as chroma keying, transforms your footage. This technique allows you to replace the green backdrop with any scene imaginable.
Choose a reliable video editing software that supports chroma key. Adobe Premiere Pro, Final Cut Pro, and DaVinci Resolve are popular choices among creators. These platforms offer robust tools that simplify the process, making it accessible even for beginners.
When applying the chroma key effect, ensure the green screen is consistently lit. This uniformity helps the software distinguish between the background and your subject. Check for shadows and adjust as needed to achieve a clean key.
Tackle any remaining issues with finesse using additional editing tools. Look out for color spill, where green hues leak onto the subject. Use software features to correct these anomalies for a professional finish.
Here are a few editing basics to keep in mind:
- Select appropriate video editing software.
- Ensure consistent lighting in your footage.
- Use chroma key tools to clean edges effectively.
Mastering background removal is more art than science. It requires a mix of technical skill and a keen eye, ensuring your content stands out with unmatched professionalism.
Advanced Green Screen Video Editing Techniques
Once you’ve mastered the basics, it’s time to level up with advanced editing techniques. These methods can elevate your content, making it more engaging and visually dynamic.
Start with color grading. This technique adjusts colors to match the background seamlessly with the subject, resulting in a cohesive look. Proper color grading enhances mood and adds depth to your videos.
Next, explore motion tracking. This feature ensures that moving objects maintain their background alignment. It’s crucial for maintaining realism, especially when subjects or camera angles shift during shooting.
Edge feathering is another professional tool. It softens the borders between your subject and the green screen. This technique can eliminate harsh lines, ensuring a seamless transition.
Finally, don’t overlook the power of plugins. Many editing programs offer plugins that simplify complex tasks. These tools can drastically cut editing time while boosting the quality of your work.
To get the best results, consider the following advanced techniques:
- Color grading for tone matching.
- Motion tracking for dynamic shots.
- Edge feathering for soft transitions.
These techniques are your ticket to creating professional-grade videos that captivate and impress your audience.
Common Green Screen Mistakes and How to Avoid Them
Using a green screen can transform your videos, but mistakes can quickly ruin the magic. Awareness is your best ally.
One frequent error is inconsistent lighting. Shadows can disrupt the seamless look, making the edit obvious. Always ensure your lighting is even and consistent across the screen.
Another pitfall is forgetting about clothing colors. If your subject’s attire matches the screen, they’ll partially vanish. Avoid green and use contrasting colors for your subjects instead.
Uneven screens are also a problem. Wrinkles create shadows that complicate keying. Make sure to smooth out your screen before recording.
Here are some mistakes to avoid:
- Inconsistent lighting across the screen.
- Subject wearing green clothes.
- Wrinkled or uneven screens.
By sidestepping these common pitfalls, you’ll save valuable editing time and significantly enhance your video’s quality.
Creative Ideas: Elevate Your Content with Green Screen Magic
Green screens aren’t just practical—they’re a gateway to creativity. They allow you to explore storytelling in new ways. By experimenting with backgrounds, your content can reach new heights.
Consider creating a virtual set for your podcast. This approach can add depth and professionalism that stands out. Livestreams also benefit from dynamic backgrounds.
You can even integrate animated elements for interactive experiences. Think about adding fun graphics or incorporating current events into your backdrop. These touches can captivate your audience and enrich the viewing experience.
Here are some creative ideas to consider:
- Virtual sets for polished aesthetics.
- Dynamic backgrounds for livestreams.
- Animated graphics for viewer interaction.
With a bit of imagination and effort, your green screen can open endless possibilities, letting your personality and brand shine through.
Final Green Screen Tips for Aspiring Podcasters and Creators
As you dive into green screen video production, keep flexibility and practice in mind. This journey is about continuous learning and adaptation to what works best for your content.
Remember, experimentation is your ally. Trying different techniques will unlock what truly suits your style and audience. Consistency in setup and process is crucial, too, as it ensures reliable quality.
Here’s a concise list to wrap up with:
- Keep experimenting and learning.
- Maintain consistency in your setup.
- Embrace flexibility in production techniques.
These final tips will guide you toward maximizing the potential of green screen technology, enhancing your creative output efficiently. Enjoy the process, and watch your content thrive!